Adding an E-Junkie Shopping Cart to WordPress
by CJ on Mon 09 Aug, 2010
The Unknown Artifact (UA) online shopping cart is finally live on the website. It’s another major task that can be crossed off the list before concentrating on designing and printing. I’m sure I will be updating and tweaking the appearance and usability of the shopping cart over time but, for now, I’m thankful the important bits are (finally!) up and running.
For those who like to look at code, the following are some rough notes about the implementation. Specifically, these notes will focus on how this WordPress site integrates with a 3rd-party shopping cart solution. In addition, these notes will highlight how the online shopping cart’s Grid View was implemented.
E-Junkie Shopping Cart
I decided to use the E-Junkie shopping cart for many reasons. The primary ones were for its 1,) low-cost full-featured capabilities and 2,) centrally managed services. For an affordable monthly fee (no per purchase fees), the E-junkie shopping cart has all the features I’m looking for including easy support for variants, inventory, coupon codes, affiliates, and sales tracking (to name a few). In addition to all the nifty features, I can implement this same shopping cart in any context. Meaning, all the product configurations for the UA shopping cart will work not just in this website but also in a Facebook Fan Page, eBay page, MySpace page, and anywhere else I can cut-and-paste a chunk of code. This shopping cart can retrofit to any context and is not just tied to this website, which is quite nice.
So far, I’m very pleased with the straight-forward ease of implementation. The E-Junkie shopping cart allows users to configure products and related fees for tangible goods such as shipping, packaging, and taxes (if applicable). From there, E-Junkie produces a code snippet for you to insert into a web page. It works great. Here is an example of a View Cart button code snippet:
<a class="ec_ejc_thkbx" onclick="javascript:return EJEJC_lc(this);" href="https://www.e-junkie.com/ecom/gb.php?c=cart&cl=124503&ejc=2" target="ej_ejc">
<img src="https://www.e-junkie.com/ej/ej_view_cart.gif" border="0" alt="View Cart" />
</a>
<script type="text/javascript">// <![CDATA[
        function EJEJC_lc(th) { return false; }
// ]]></script>
<script src="https://www.e-junkie.com/ecom/box.js" type="text/javascript"></script>
I did put in a little extra effort to ensure a proper foundation for using the shopping cart in WordPress. For instance, this site has the Raw HTML Compatibility WordPress plugin installed so that WordPress does not mangle the code snippets with automatic formatting. I also took some extra time to further abstract the code snippets so that I could easily re-use them across many posts (described next).
Product Pages Are WordPress Blog Posts
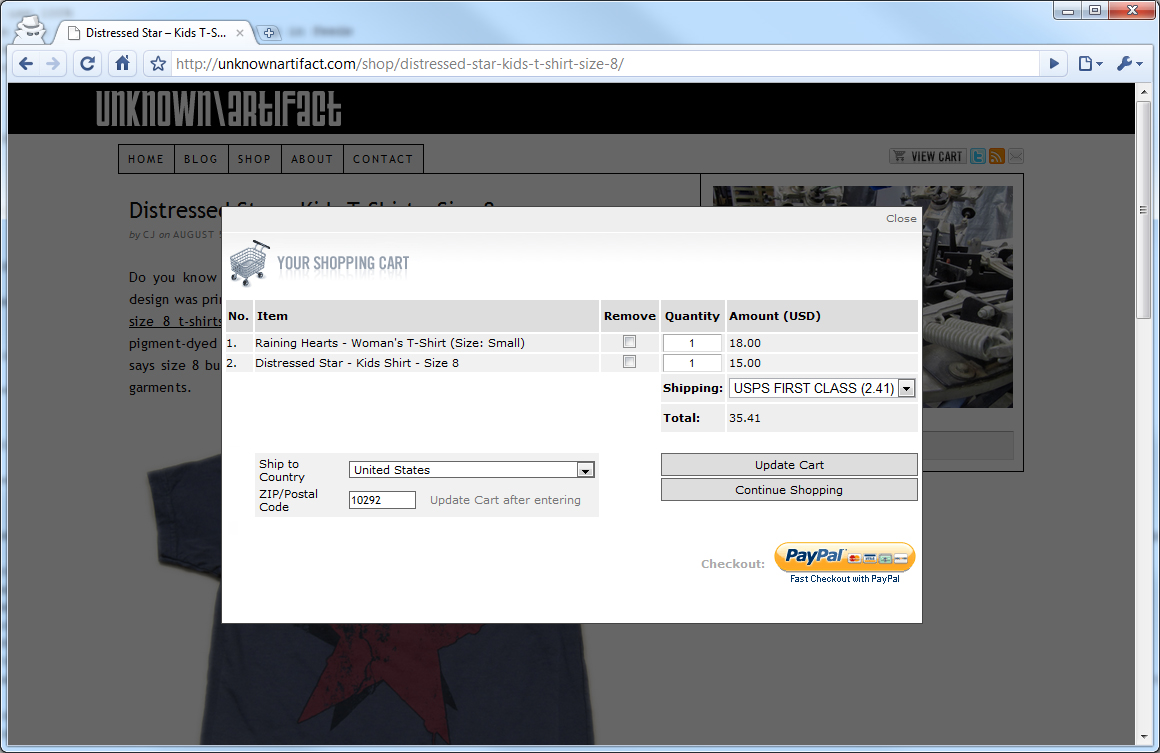
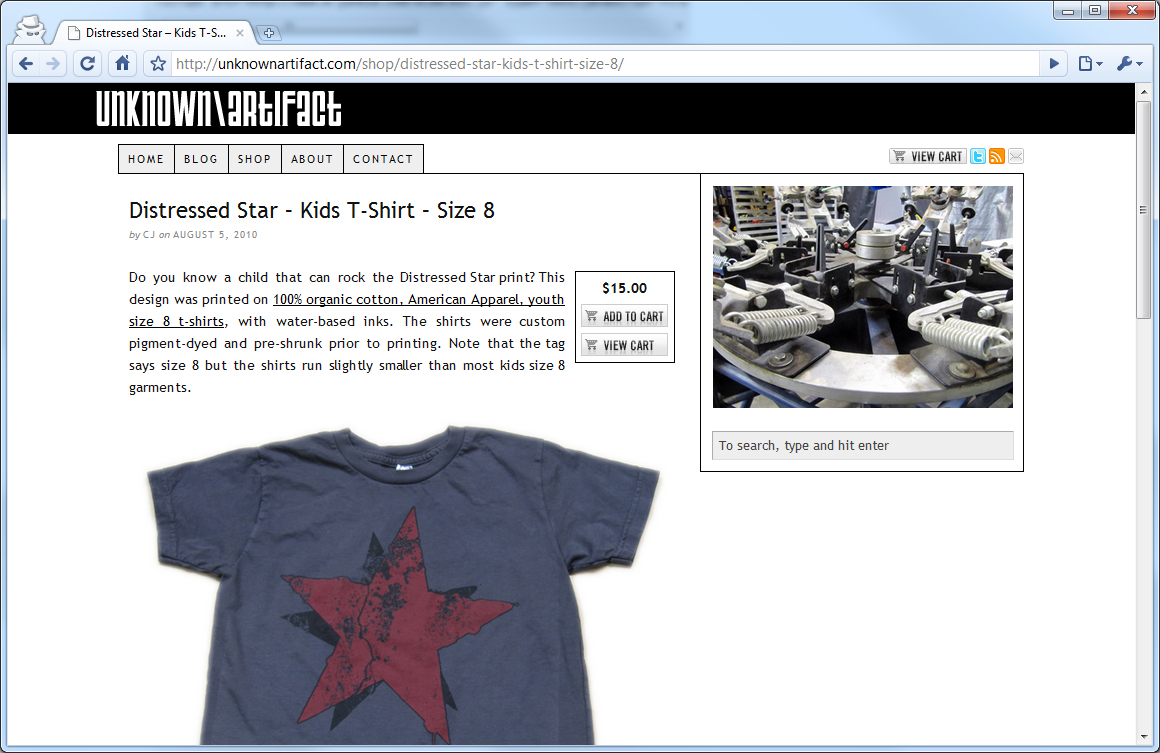
All the product pages on this site will likely be WordPress blog posts. The following is a picture of the Distressed Star product page with the Add to Cart and View Cart buttons. Click on the image to enlarge.
Having blog posts as product pages is convenient since every one of UA’s blog posts automatically shows up in a UA subscriber’s RSS reader (such as Google Reader), a UA follower’s Twitter feed, and UA fan’s Facebook Page. The unfortunate side-effect of pasting the shopping cart code into a blog post is that the code itself shows up in RSS reader (and other places) as text. In many cases, the SCRIPT tags are stripped out and all that is left is the source code which is not meant for the end-user to read. Knowing that the content is extracted in these scenarios, I hid the code snippets within referenced JavaScript files. The code snippets themselves are then dynamically drawn in during the page load stage. This prevents the unsightly source code from appearing in a UA subscriber’s RSS reader and yet still allows the shopping cart to be visible and functional in the UA website.
The following code snippet is an example of what goes into a WordPress post or page. Highlighted in yellow is the referenced JavaScript file that dynamically creates the shopping cart functionality in the page:
<!--start_raw-->
<link rel="stylesheet" href="/wp-content/themes/thesis_17/custom/ua-cart.css" type="text/css" />
<script src="/wp-content/themes/thesis_17/custom/ua-cart-2.js" type="text/javascript"></script>
<!--end_raw-->
Product information goes here...
The following code snippet is the content of the ua-cart-2.js file. This code dynamically generates the shopping cart functionality:
(function() {

	var uaWriteShoppingCart = function(itm, price, type, options) {

		var str = '';

		itm = itm || '';
		price = price || '$'
		type = type || 1;

		var cl = '124503';
		var url = 'https://www.e-junkie.com/ecom/gb.php?c=cart;i=' + itm + ';cl=' + cl + ';ejc=2'

		var uaGenerateCartOptions = function() {

			var optns = [];
			options = options || 'Small|Medium|Large|X-Large|XX-Large';
			options = options.split('|');
			for (var n=0; n<options.length; n++)
			{
				optns.push('<option value="' + options[n] + '">'' + options[n] + '</option>');
			}
			return optns.join('');
		};

		switch (type)
		{
			case 1:
				options = uaGenerateCartOptions();
				str = '<div class="ua-item-cart">' +
						'<div class="ua-item-price">' + price + '</div>' +
						'<form class="ua-item-form" action="' + url + '" accept-charset="UTF-8" method="POST"><input name="on0" type="hidden" value="Size" />' +
						'<select class="ua-item-select" name="os0">' + options + '</select>' +
						'<input class="ec_ejc_thkbx" onclick="javascript:return EJEJC_lc(this.parentNode);" alt="Add to Cart" src="https://www.e-junkie.com/ej/ej_add_to_cart.gif" type="image" />' +
						'</form><a class="ec_ejc_thkbx" onclick="javascript:return EJEJC_lc(this);" href="https://www.e-junkie.com/ecom/gb.php?c=cart&cl=' + cl + '&ejc=2" target="ej_ejc">' +
						'<img src="https://www.e-junkie.com/ej/ej_view_cart.gif" border="0" alt="View Cart" />' +
						'</a>' +
						'<scr'+'ipt src="https://www.e-junkie.com/ecom/box.js" type="text/javascript"></scr'+'ipt>' +
						'</div>';
				break;
			case 2:
				str = '<div class="ua-item-cart">' +
						'<div class="ua-item-price">' + price + '</div>' +
						'<a href="' + url + '" target="ej_ejc" class="ec_ejc_thkbx"><img src="https://www.e-junkie.com/ej/ej_add_to_cart.gif" border="0" alt="Add to Cart"/></a>' +
						'<a class="ec_ejc_thkbx" href="https://www.e-junkie.com/ecom/gb.php?c=cart&cl=' + cl + '&ejc=2" target="ej_ejc">' +
						'<img src="https://www.e-junkie.com/ej/ej_view_cart.gif" border="0" alt="View Cart" />' +
						'</a>' +
						'<sc'+'ript src="https://www.e-junkie.com/ecom/box.js" type="text/javascript"></scri'+'pt>' +
						'</div>';
				break;
		}

		document.write(str);
	}

	var titleHas = function(txt) {
	    titleHas.title = titleHas.title || jQuery('.entry-title').last().html() || '';
		return (titleHas.title.toLowerCase().indexOf(txt.toLowerCase()) >= 0);
	};

	if (titleHas('Distressed Star')) uaWriteShoppingCart('784920', '$15.00', 2);
	else if (titleHas('Einstein Wearing 3D Glasses')) uaWriteShoppingCart('769286', '$15.00', 2);
	else if (titleHas('Lorem Ipsum Dolor')) uaWriteShoppingCart('769461', '$15.00', 2);
	else if (titleHas('Raining Hearts')) uaWriteShoppingCart('785156', '$18.00', 1, 'Small|Medium|Large|X-Large');
})();
Creating a Grid Layout (Thumbnail View)
When you look at most online shopping carts, they not only have a product page for every product but they also have a Grid View. A Grid View is, a sometimes paginated, thumbnail view of all the products in the online store. The user can navigate to the product page by clicking on its associated thumbnail. The following is a picture of UA’s Shop page with a Grid View (which only has four products at this time):
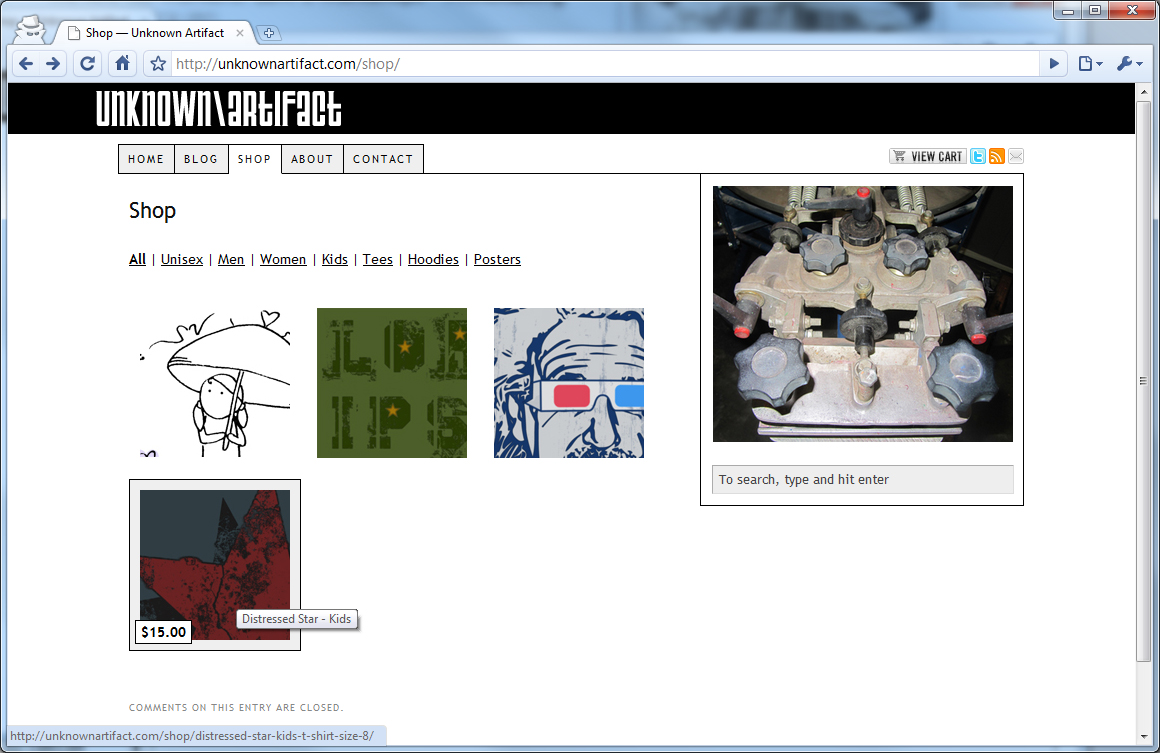
A Grid View is something that E-Junkie does not provide for its users – not that they should. That said, a Grid View is something I felt the UA website required so I went about rolling my own simple Grid View in JavaScript. The UA Shop web page is a dedicated WordPress page that was added to the main navigation. In that page is the following code snippet. Highlighted in yellow is the JavaScript implementation file:
<!--start_raw-->
<link rel="stylesheet" href="/wp-content/themes/thesis_17/custom/ua-shop.css" type="text/css" />
<script type='text/javascript' src='/wp-content/themes/thesis_17/custom/ua-shop.js'></script>
<p> <!--orphaned P tag fix-->
<a id="ua-All" class="ua-shop-lnk" href="#All">All</a> |
<a id="ua-Unisex" class="ua-shop-lnk"  href="#Unisex">Unisex</a> |
<a id="ua-Men" class="ua-shop-lnk"  href="#Men">Men</a> |
<a id="ua-Women" class="ua-shop-lnk"  href="#Women">Women</a> |
<a id="ua-Kids" class="ua-shop-lnk"  href="#Kids">Kids</a> |
<a id="ua-Tees" class="ua-shop-lnk"  href="#Tees">Tees</a> |
<a id="ua-Hoodies" class="ua-shop-lnk"  href="#Hoodies">Hoodies</a> |
<a id="ua-Posters" class="ua-shop-lnk"  href="#Posters">Posters</a>
<!--end_raw-->
<div id="products"></div>
The following code snippet is the content of the ua-shop.js file. This code dynamically generates the Grid View:
jQuery(document).ready(function() {

	if (!window.console) console = {};
	console.log = console.log || function(){};
	console.warn = console.warn || function(){};
	console.error = console.error || function(){};

	var products = [
		{ price:'$18.00', cls:'product', value:'Product', classification:'|All|Women|', href:'/shop/raining-hearts-womans-t-shirt/', img:'/wp-content/themes/thesis_17/custom/images/rh-150x150.jpg', title:'Raining Hearts - Women' },
		{ price:'$15.00', cls:'product', value:'Product', classification:'|All|Kids|', href:'/shop/lorem-ipsum-dolor-kids-t-shirt-size-8/', img:'/wp-content/themes/thesis_17/custom/images/li-150x150.jpg', title:'Lorem Ipsum Dolor - Kids' },
		{ price:'$15.00', cls:'product', value:'Product', classification:'|All|Kids|', href:'/shop/einstein-wearing-3-d-glasses-kids-t-shirt-size-8/', img:'/wp-content/themes/thesis_17/custom/images/einstein-150x150.jpg', title:'Einstein Wearing 3D Glasses - Kids'  },
		{ price:'$15.00', cls:'product', value:'Product', classification:'|All|Kids|', href:'/shop/distressed-star-kids-t-shirt-size-8/', img:'/wp-content/themes/thesis_17/custom/images/ds-150x150.jpg', title:'Distressed Star - Kids'  }
	];

	var show = function(key) {
		var html = [];
		key = key || '|All|';
		for (var n=0; n<products.length; n++) {
			var obj = products[n];
			if (obj.classification.indexOf(key) >= 0) {
				html.push('<a class="' + obj.cls + '" href="' + obj.href + '"><span class="product-price">' + obj.price + '</span><img src="' + obj.img + '" alt="' + obj.title + '" title="' + obj.title + '" /></a>');
			}
		}

		jQuery('.ua-shop-lnk').removeClass('shop-strong');
		jQuery('#ua-' + key.replace(/\|/g, '')).addClass('shop-strong');
		jQuery('#products').html(html.join('') || 'No products available under this heading yet.');

		jQuery('.product').mouseover(function(e) {
			jQuery(this).find('span').css('display', 'inline');
		});
		jQuery('.product').mouseout(function(e) {
			jQuery(this).find('span').css('display', 'none');
		});
	};

	jQuery('.ua-shop-lnk').click(function(e) {
		var key = '|' + this.id.replace('ua-', '') + '|';
		show(key);
		return false;
	});

	show();
});
One of the nice things about a JavaScript solution for a Grid View is that it’s fast. Most other Grid Views rely on making a request from the server and database before the browser renders the Grid View. The JavaScript version doesn’t need to make any requests to filter the products in the Grid View. All of the filtering is done in the client browser.
Custom View Cart Button
Another thing worth mentioning is the custom View Cart button in the upper right corner of this site. This button was added to the main WordPress template and is accessible from every page. This accessible View Cart button is the finishing touch to the online shopping cart experience.
Summary
I’m quite pleased with the E-Junkie shopping cart solution thus far. Their solution is flexible and easy to use. All the extra code bits I created were simply an attempt to make it easier to work with E-Junkie code snippets specific to this site over time. Of course, there are likely other ways to accomplish what I did. Any suggestions and feedback are greatly appreciated.


